In This Article
At one point or another, we all have experienced the Google Play has stopped error message, which looks similar to “Unfortunately, Google Play store has stopped working” or “Unfortunately, Google Play services have stopped working.”
The problem with this type of error is that the message keeps appearing every 2 to 3 seconds, which prevents you from using your Android device and causes frustration. As a quick fix, most Android users factory reset their phone or tablet when the issue arises. Although the reset takes no more than five minutes, it removes all of your stored important data and the personalization you have made to your phone or tablet.
We have compiled a list of 10 simple and reliable solutions with step-by-step instructions to help you resolve the error message ‘Google Play store has stopped working.’ Before attempting the suggested fixes, we recommend performing basic checks on your Android device, such as ensuring the Internet connection works properly.
You may also need to switch between cellular data and Wi-Fi, as connectivity issues with the Wi-Fi router can sometimes cause problems with Google Play. If the above suggestions do not resolve the ‘Google Play has stopped working’ issue, please try the following ten solutions one by one to fix the error on your Android device.
1. Clear Cache and Data of Google Play Store
Every Android app stores some part of data and files on your Android device for later usage, like images, formatting, and other relevant files. When you reopen the app later, these cache and other relevant data are stored on your device to save time and processing power because all of the cached data are served quickly.
Sometimes, cached data and app data are corrupted, causing certain apps to stop unexpectedly. But the good thing is that we can quickly clear cache and data with just a tap on the button.
IMPORTANT: Clearing Play Store data is like pressing a reset button, removing your saved account information, such as Google account login details. After clearing data, Google Play will ask you to enter your Google username and password again, so make sure you remember your login details before following the steps.
Here are the steps:
- Go to Settings, then tap on Apps.
- Look for Google Play Store and tap on it in the list of apps.
- Tap on Storage.
- Tap on the Clear Cache and Clear Data button.
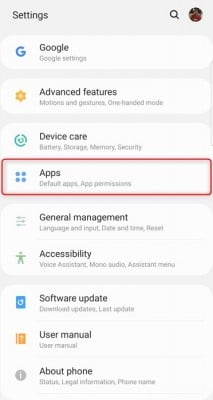
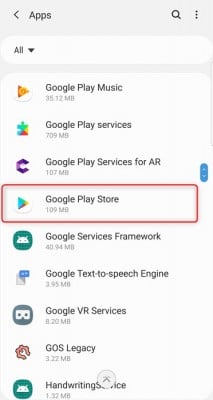
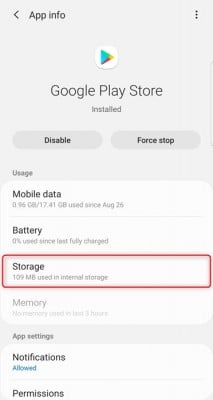
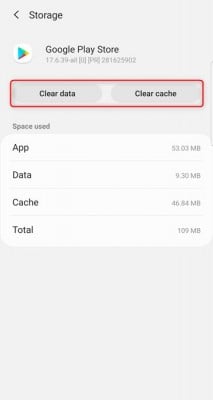
Now restart your device and see if the Google Play Store has stopped the error. If not, proceed to the next step.
2. Clear Data and Cache of Google Play Services
If clearing the Google Play Store cache and data did not fix the issue, then some chances clearing the Google Play Services cache and data should help rectify the issue.
IMPORTANT: Clearing Play Services data will remove your saved account information, such as Google account login details. After clearing data, Google Play Services may ask you to enter your Google username and password again, so make sure you remember your login details before following the steps.
Here are the steps:
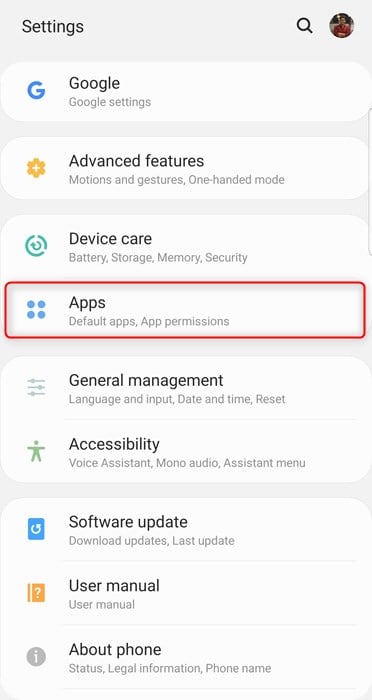
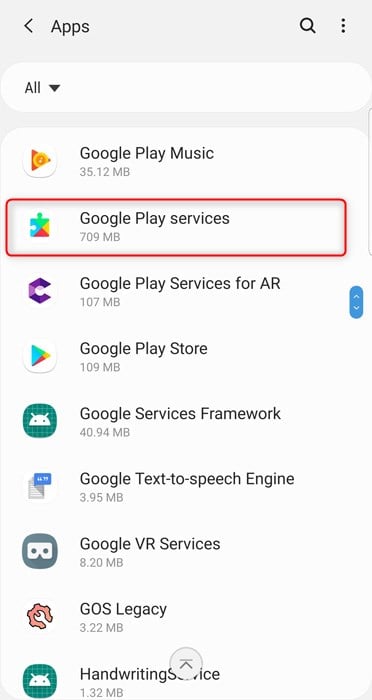
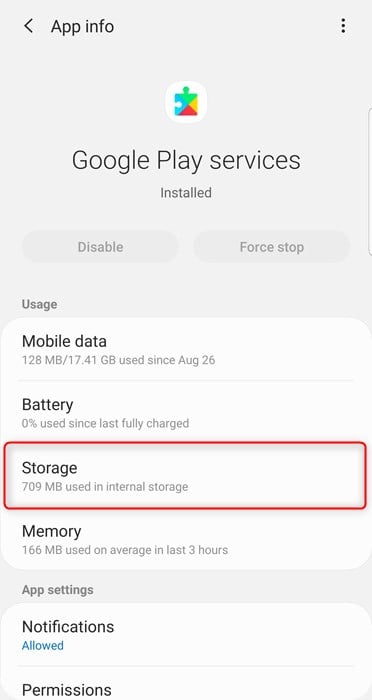
- Go to Settings, then tap on Apps.
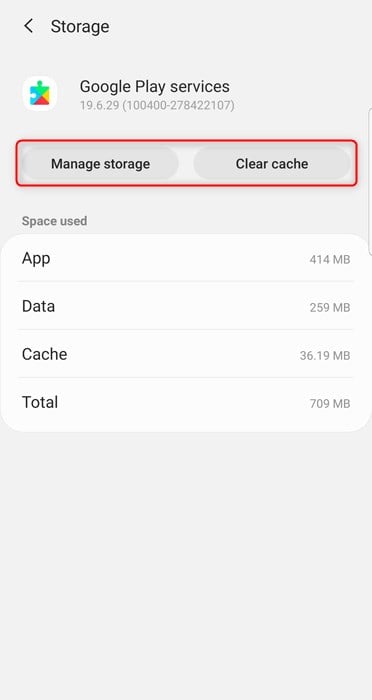
- In the list of apps, look for Google Play Services and tap on it.
- Tap on Storage.
- Tap on the Clear Cache and Clear Data button.
3. Clear Cache and Data of Google Services Framework
The Google Play Store and Google Play Services depend on Google Services Framework to ensure your data is properly synced with your account and everything runs smoothly. The Services Framework takes care of Google Play Store Services, syncing your contacts, Google Backup, and managing your account.
If the Google Services Framework is faulty, your device cannot connect to the Google servers, which causes Google Play to stop unexpectedly. Clearing the app’s cached data refreshes it and forces it to download new data.
Here are the steps to clear the Google Services Framework cache:
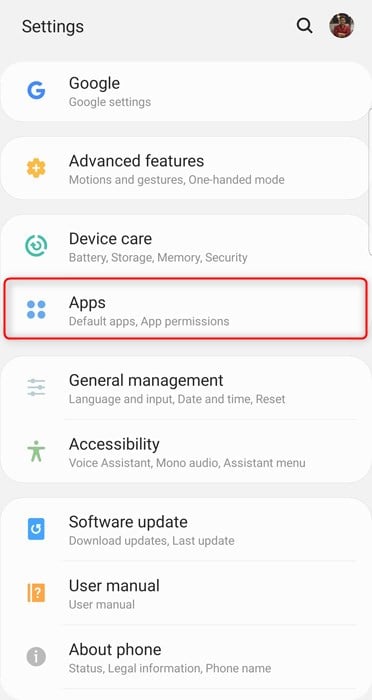
- Go to Settings, then tap on Apps.
- Tap on the menu button located at the top-right corner.
- Tap on Show System to see system apps.
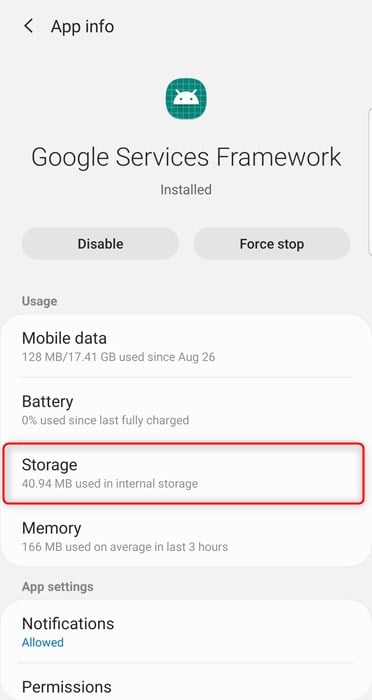
- In the list of apps, look for Google Services Framework and tap on it.
- Tap on Storage.
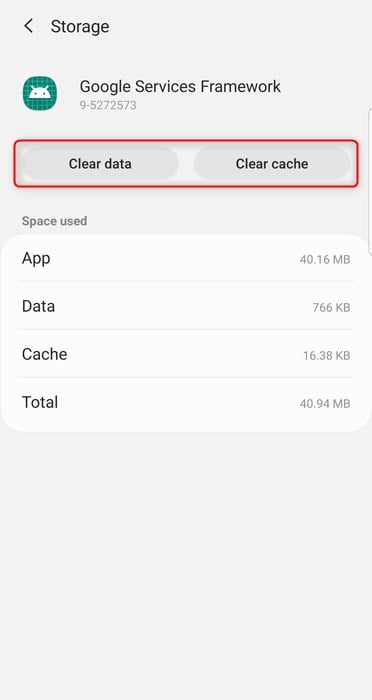
- Tap on the Clear Cache and Clear Data button.
- Restart your device.
After boot, the error message that Google Play has stopped should no longer appear. If it does, then plenty of methods exist to fix this issue. Don’t lose hope yet.
4. Reset App Preferences
You may have accidentally disabled an important part of the Android system (for example, Download Manager), which sometimes causes Google Play to stop. So, for problems related to app preferences, Android has provided us with a reset app preferences option.
It’s simple and easy. Here’s how to do that:
- Go to Settings and tap on Apps.
- On the top-right corner, there must be a menu button. Tap on it.
- And you will see an option that says, Reset app preferences.
- Tap it and then restart your device for the changes to take effect.
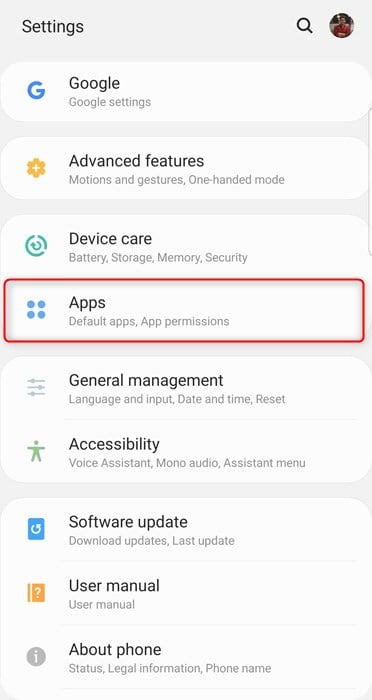
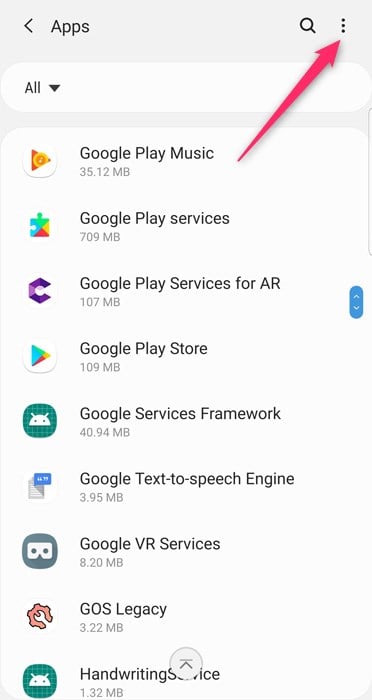
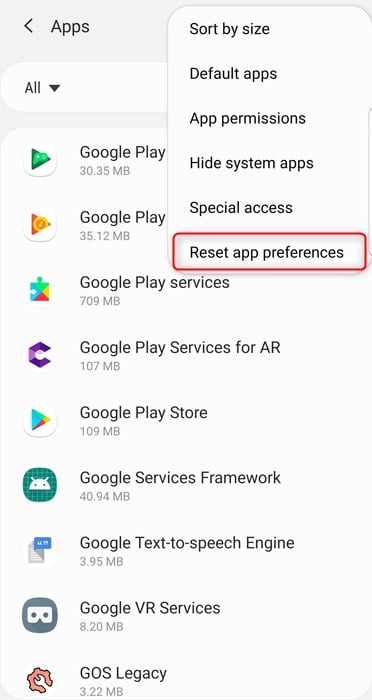
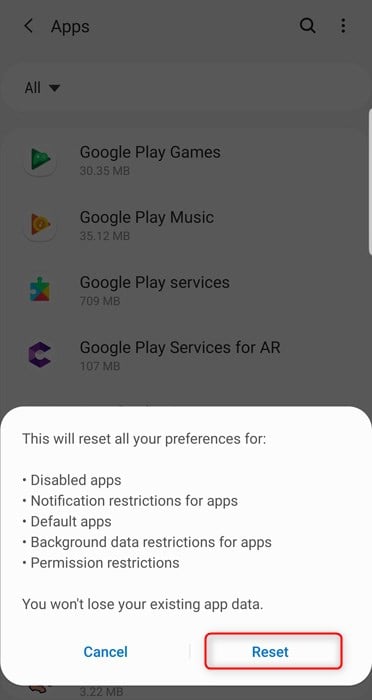
This will re-enable all the disabled apps that may be causing issues with Google Play.
5. Make Sure Download Manager Is Enabled
Android comes with a native Download Manager app used by the Google Play Store and Google Play Services to download updates for apps and Google Play itself. However, some apps with a download option modify that functionality by disabling Download Manager, which causes Google Play to stop.
Don’t worry. The steps to enable Download Manager are simple. Here’s how:
- Go to Settings, and under the Devices section, you will find Apps; tap on it.
- Tap the menu button in the upper-right corner and select Show System.
- In the list of apps, you need to find the following two apps, tap on them, and make sure each one of them is enabled:
- Download Manager, and
- Downloads.
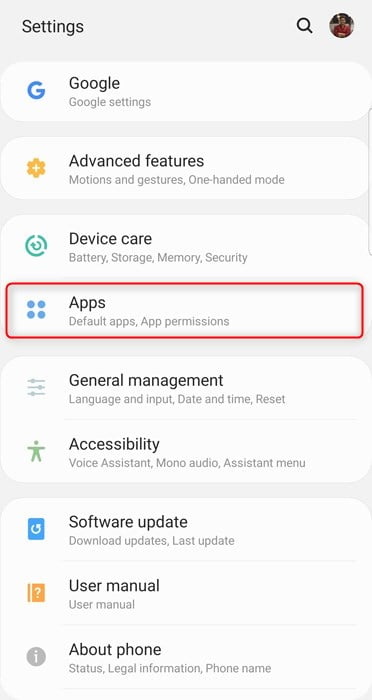
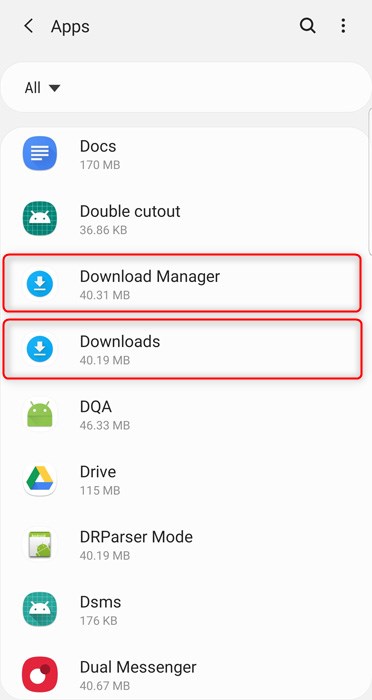
If both apps were already enabled, we suggest you try the other solutions mentioned in this article. One of them should fix Google Play’s stopped-working issue.
6. Allow Background Data Usage and Enable WiFi Data Access
While troubleshooting the problem and finding out why the Play Store is being stopped frequently, we discovered an option (i.e. Background Data) located under Data Usage, which, once configured, will not allow the app to use cellular data in the background. Another option is to Disable All Wi-Fi Data Access, which, once enabled, will not allow the app to access the Internet via Wi-Fi networks.
If both of these options are enabled on your device, Google Play Store and Google Play Services cannot synchronize your device with your account, causing both apps to stop unexpectedly. Moreover, it will prevent Google Play Store from updating any app.
To fix this problem, we must ensure that essential apps are allowed background data usage and have Wi-Fi data access. Here is how you can do that:
- Go to Settings and tap Apps.
- Find and tap on Download Manager.
- Tap on Data Usage.
- Under Cellular data access, the toggle switch for Background data should be enabled.
- Under Wi-Fi data access, make sure the toggle switch for Disable all Wi-Fi data access is disabled.
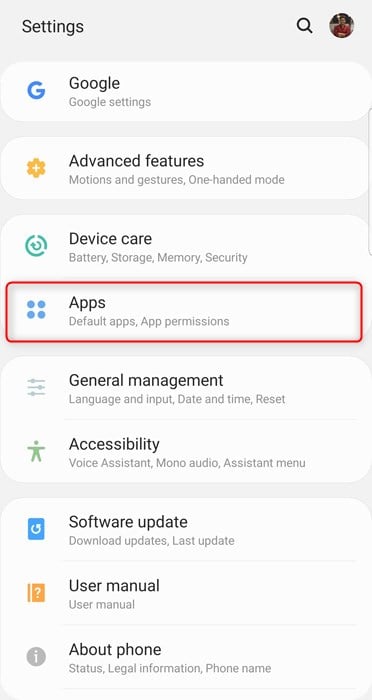
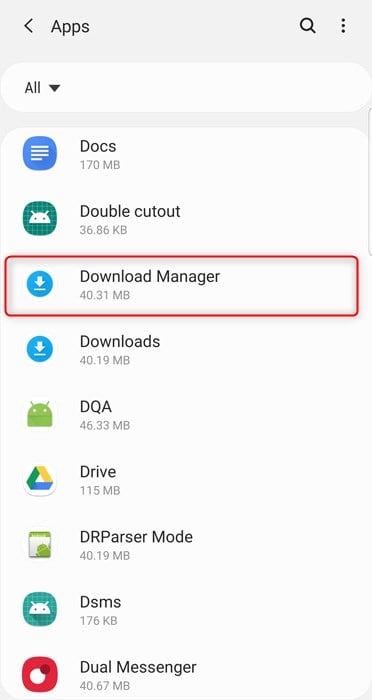
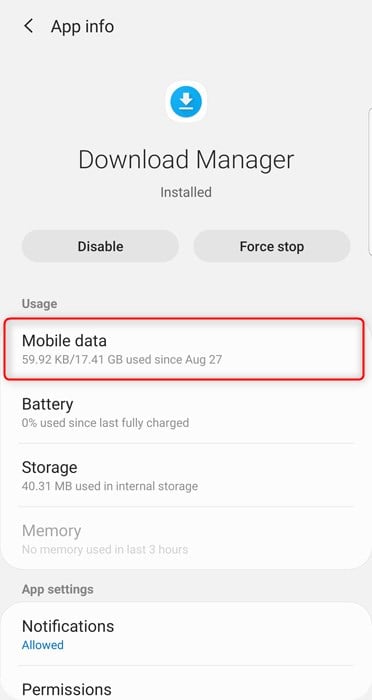
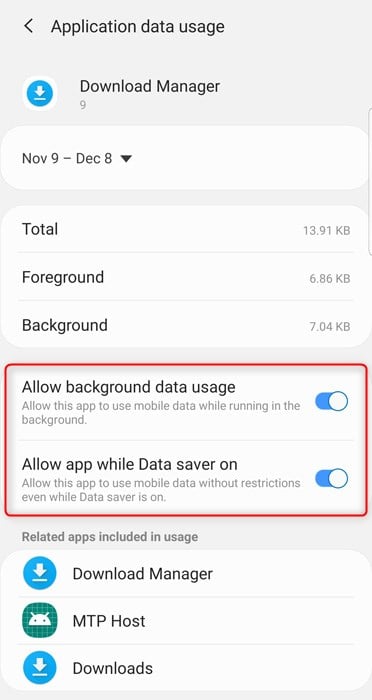
Now, the above steps are for the Download Manager app. You need to perform similar steps for the following apps, too:
- Downloads,
- Google Play Services,
- Google Play Store, and
- Google Services Framework.
Once you have verified all the above apps have background data access and Wi-Fi data access, you need to restart your Android device. Once your device boots up, you will notice that the, unfortunately, Google Play has stopped error message is gone.
7. Check Date and Time Settings
Yes, incorrect date and time settings on your Android device can cause serious issues with how Google Play works. This is mainly because the timestamp synchronizes your data and account information between your device and apps.
In most cases, date and time settings are automatically updated using your Internet connectivity or information provided by your network. So, you must first ensure automatic date and time updates are enabled.
To check that, follow these steps:
- Go to Settings, and under the System section, you will find the Date & time.
- Here, a toggle switch will tell you whether the automatic date and time are enabled or disabled.
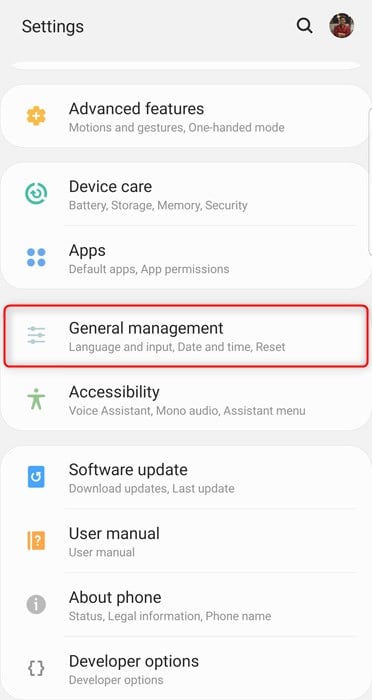
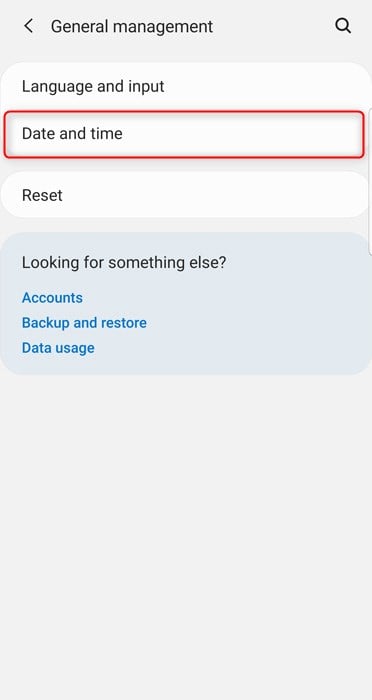
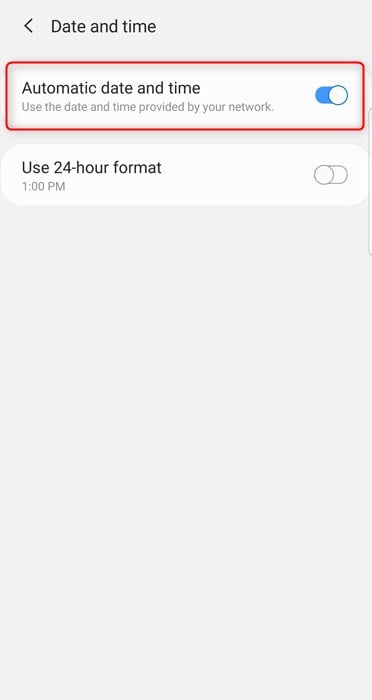
Enabling automatic date and time will force your Android device to use the network-provided date and time and prevent you from manually modifying it.
If the automatic date & time are already enabled, then we recommend that you disable it and try to manually configure the time and date while being as precise as possible.
8. Force update Google Play to the latest version
Google frequently releases a new version of the Google Play Store, which brings bug fixes and improvements and increases compatibility with other Android apps. Sometimes, devices are stuck on an old Google Play version, but dependent apps are updated, which causes forced closes and errors.
This is where we need to force the Google Play Store to update to the latest version. It’s easy, and here is how you can do that:
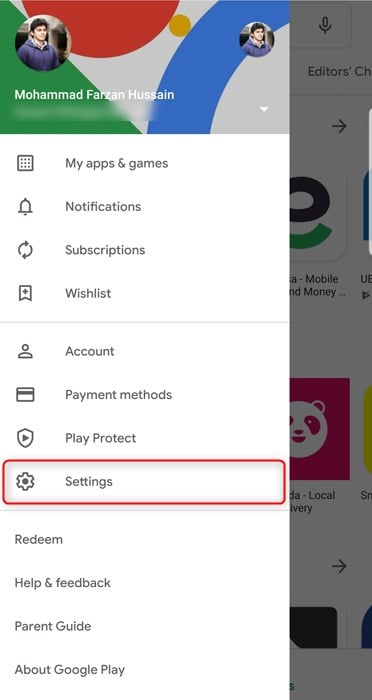
- On your Android device, open the Google Play Store app and tap on the menu button.
- Tap on the Settings.
- Then, under the About section, look for Play Store Version and tap on it.
- A pop-up message box will appear stating that Downloading and installing the new Google Play Store will begin shortly.
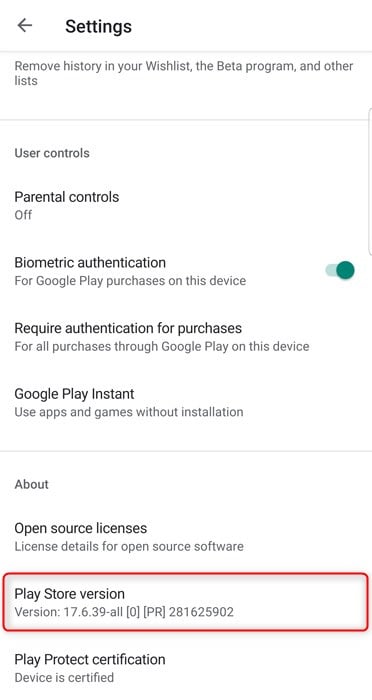
It will take some time to download and install your device’s latest Google Play version. Once the new version with all the bug fixes is installed, you will no longer experience the Google Play has stopped error message.
9. Remove Google Account from Your Device and Add It Again
Several instances have occurred when the Google account failed to sync your data, causing the Google Play Store and Google Play Services to stop unexpectedly. To fix this issue, Android allows you to remove your Google account from your device and re-add it without any data loss.
This simple procedure refreshes the link between your Android device and Google account, eliminating the Google Play has stopped errors from popping up again. Before proceeding, please remember your Google login details, as you need to enter them after removal.
First, we will perform the steps to remove your Google account from your Android device:
- Go to Settings, and under the Personal section, you will find Accounts. Tap it.
- You will now see a list of all the accounts added to your device. Tap on Google.
- Tap on the email address you want to remove.
- On the top-right corner you will see a menu button, tap it.
- Then select Remove account.
- Your account should be successfully removed now.
We will now add the Google account again:
- Go to Settings -> Accounts.
- Here, you will see the Add Account option; tap on it.
- From the list of options, select Google.
- You will now be requested to enter your Google login details, i.e., your email address and password.
- The account should be added to your device, and begin syncing your data.
10. Uninstall Google Play and Then Update To The Latest Version
Unlike regular user apps on your Android device, Google Play Store and Google Play Services are system apps and cannot be removed or uninstalled like other apps because they are a part of the Android system framework. Rather than letting you uninstall, Android allows you to uninstall their updates and roll back to the original factory default state.
This procedure is suggested because there are cases when Google Play is automatically updated to the latest version. Still, some bugs are left during the update process, which causes Google Play to stop repeatedly.
To fix this, we will follow the steps to uninstall all the updates and then update to the latest version.
First, we will remove updates for Google Play Services:
- Go to Settings.
- Under Device, you will find Apps. Tap it.
- In the list of apps, find Google Play Services and tap on it.
- Tap on the menu button in the top-right corner and then tap Uninstall updates.
- A popup asks you to replace this app with the factory version. All data will be removed.
- Tap on the OK button to uninstall updates.
Second, we will remove updates for the Google Play Store:
- Go to Settings -> Apps
- In the list of apps, find and tap on Google Play Store.
- Tap on the menu button located on the top-right corner and then tap on “Uninstall updates”.
- A popup box will appear asking you; Replace this app with the factory version? All data will be removed.
- Tap on the OK button to uninstall updates.
Once the updates are uninstalled successfully, restarting your device is recommended. In most scenarios, after restarting your phone/tablet, the error message: Unfortunately, Google Play has stopped does not appear anymore.
Anyways, we will now go through the steps of updating Google Play Services and Google Play Store to the latest version.
First, we will update the Google Play Store by following these steps:
- Launch the Google Play Store app on your Android device.
- Tap on the menu button in the upper-left corner.
- Tap on Settings.
- Scroll down until you find an option that says, Build number. Tap it.
- You will see a popup about the new Google Play Store version. Then, downloading and installation will begin shortly.
Now, we will update Google Play Services to the latest version:
- Launch any app that relies on Google Play Services like Gmail, Maps, or Hangouts.
- After launching the app, you will see a notification about Get Google Play services and an Install button.
- Tap on install, and the latest version of Google Play services will be automatically downloaded and installed on your device.
- Now restart your device to apply the changes.
That’s it. The whole process is a little longer but should fix unfortunately Google Play has stopped the error message on Android.
Final Thoughts
These were the eleven methods to fix the Google Play’s stopped working error message with the Google Play Store and Google Play Service. We hope these steps have helped you resolve the error.
If none of the solutions mentioned fixed your problem and the problem continues, there is a chance that the issue is non-generic and specifically related to your phone or tablet.
If that is the case, we highly recommend you post your problem along with your device model number in our official forums here or leave your comment below. Our Android expert team will get back to you shortly to resolve your issue.


